
Tc36x 双核OS系统
Source Core 源核:调用API、发起跨核请求的核心
Target Core 目标核:执行API、响应跨核请求的核心
多核共享变量
On Aurix caches must not be used for shared variables
Shared variables must be mapped to uncached memory segments.
Therefore no cache flush or invalidate is needed
在 AURIX/TC366 上,共享变量必须放在 Non-Cached 内存段(DSPR、LUM)中,以保证多核访问数据一致性
Cache缓存相关内容:https://caitlinzhou.site/archives/tircore-cache
原子操作
核0写入变量,核1读取变量
核间中断
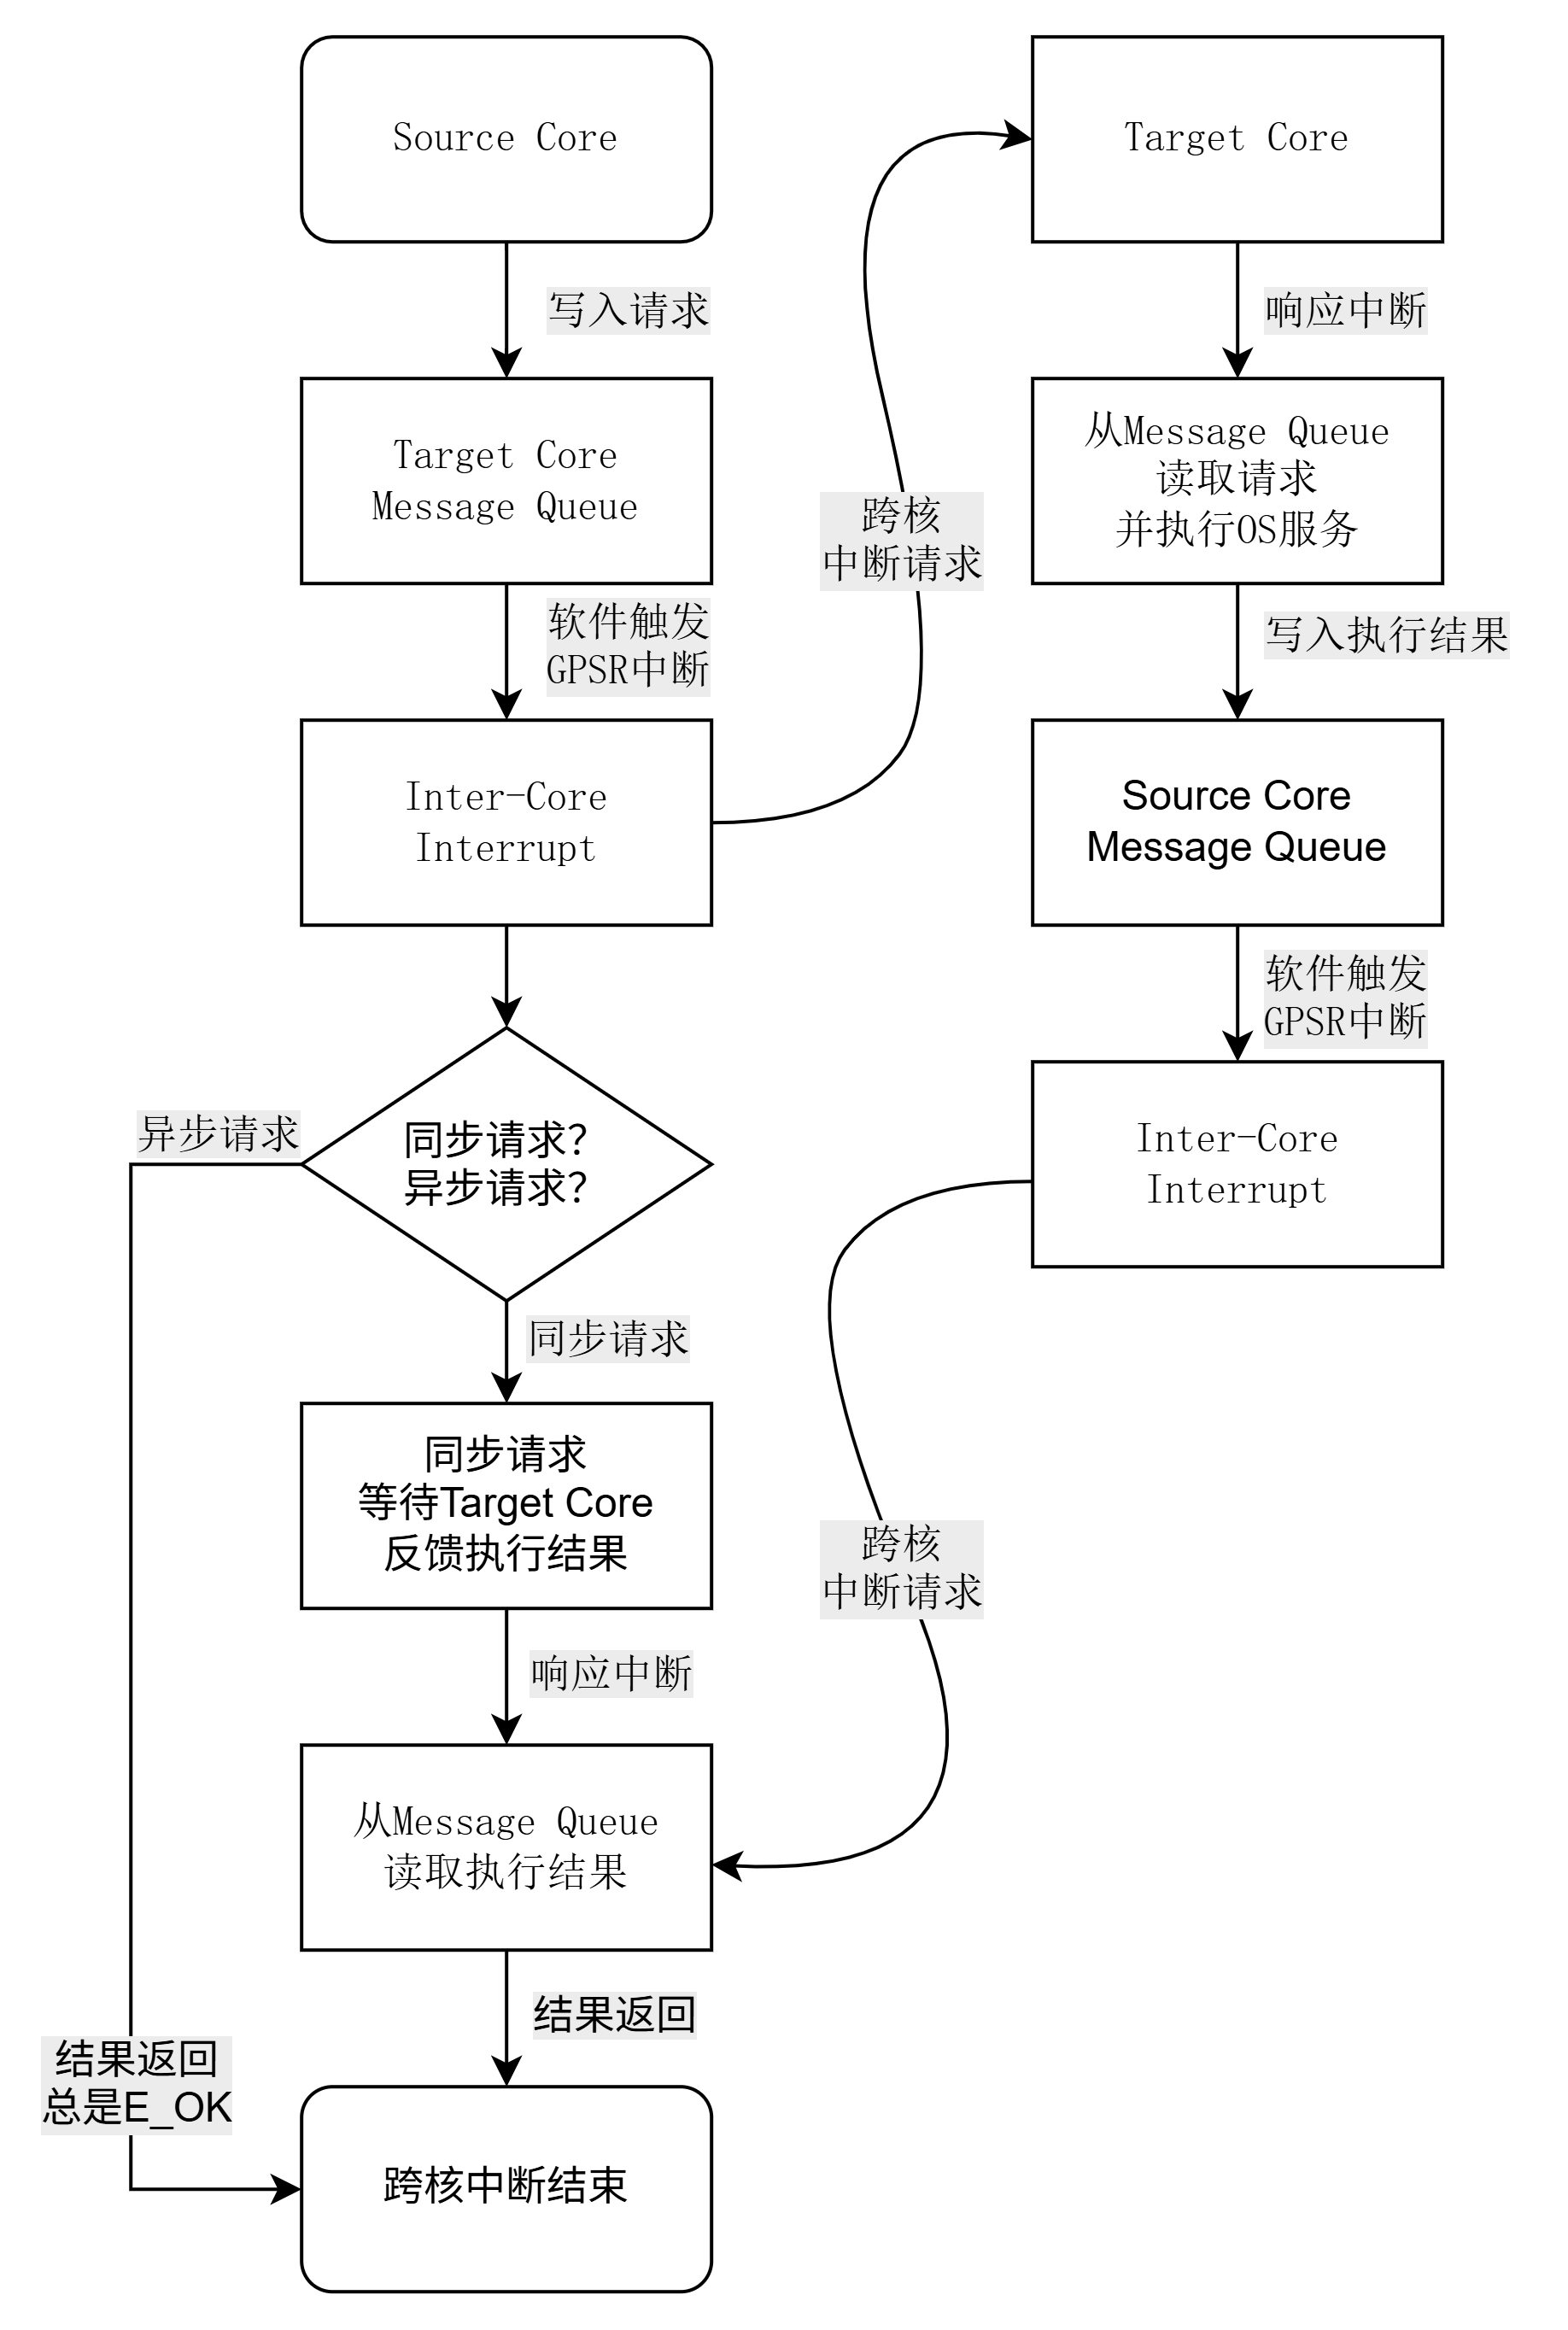
Inter-Core Interrupt 核间中断 属于OS范畴,是在多核处理器中,一个 CPU Core 通过硬件中断机制通知另一个 CPU Core 执行某项操作的方式
例如:Core0激活Core1中Task、Alarm、Schedule Table或者触发Event,等跨核操作、同步;
工作流程
特点
核间中断的优先级设置为最高 255
The signaling is done via inter-core interrupts which have the highest priority of all used interrupts assigned to them.
核间中断是通过软件触发GPSR(General Purpose Service Request)通用服务请求节点 来实现的
通过触发对应核心的GPSR中断即可响应
Core 0
  |
  | 触发 Core 1 对应的 GPSR
  v
Core 1 Service Request Node
  |
  v
Core 1 Inter-Core ISR
每个核心都需要一个核间中断
单核芯片不提供核间中断
同步核间请求与异步核间请求
同步请求是在另一个核心上触发工作并返回该工作结果的服务机制,源核需要等待请求结果,比较消耗时间;
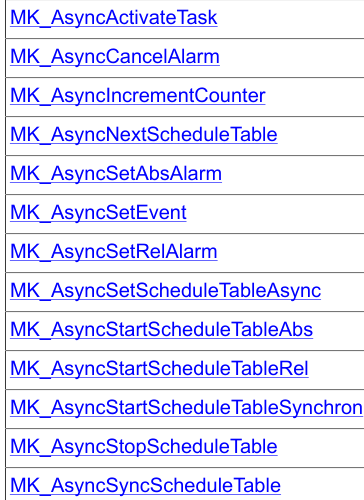
而异步请求属于“发送即遗忘”,立即返回E_OK,如有错误信息会直接响应在目标核的ErrorHook中。
异步核间请求API如下:
核间中断的实践记录过程查看启动流程部分 https://caitlinzhou.site/archives/tc36x-shuang-he#双核os启动——核间中断
启动流程
Core0在复位后跳转至启动代码Startup逻辑:
这里为MK_Entry
MK_Entry:
    disable

    /* If all symbols are mapped to cached addresses (0x8 segment), we won't see our
     * source code in the debugger, because all symbols are in a different segment than
     * our start address. We fix this by jumping to the symbol in the respective segment.
    */
    movh.a    a15, MK_imm(#,MK_hi(_realaddr))
    lea        a15, [a15] MK_lo(_realaddr)
    ji        a15
这里执行了一次地址跳转:如果符号都映射在缓存地址段(0x8 段),启动时当前执行地址与调试器显示的符号地址可能不在同一地址区域;因此这里跳到 _realaddr 对应的符号地址;
在MCU复位后,会根据BMHD跳转到启动地址,一般为0xA段的区域;
即使ld链接文件中将代码链接到了0x8段,烧录器也会将其转换为0xA段;
跳转到0x8段之后,准备一个临时的CSA区域
_realaddr:

#if MK_MAXCORES > 1
	/* The user is responsible for starting up all cores, which are under control
	 * of the Safety OS and let them jump to or call MK_Entry2.
	 * So let's call a C function, which will do this here.
	*/

	/* The stack can't be used here */
	movh.a	a10, MK_imm(#, 0x0100)

	/* Setup the CSA list, so we can call C functions.
	 *
	 * We will use space for 32 CSAs at the beginning of our core-local data scratch-pad.
	 * That's OK, because our demo doesn't have meaningful data in RAM before startup.
	 *
	 * We don't start at offset 0, because some compilers use loop unrolling optimizations
	 * which will cause traps due to accesses to "different segments" (trap class 2, tin 5).
	*/
	movh	d4, MK_imm(#, 0xd000)
	add		d4, d4, MK_imm(#, 0x40)  // d4 = 0xD0000040:CSA 区域起始地址
	mov		d6, MK_imm(#, 0x800)     // d6 = 0x800:区域大小为 0x800 字节
	add		d5, d4, d6
	jl		MK_BootCsaList           // 初始化Boot CSA

	/* Now call the C function which starts the other cores etc.
	*/
	call	Tmpl_DemoStartup         // 初始化CSA后,允许调用Call指令,进入多核启动流程
#endif


j MK_Entry2 // OS启动流程初始化CSA后,跳入Tmpl_DemoStartup 启动core1
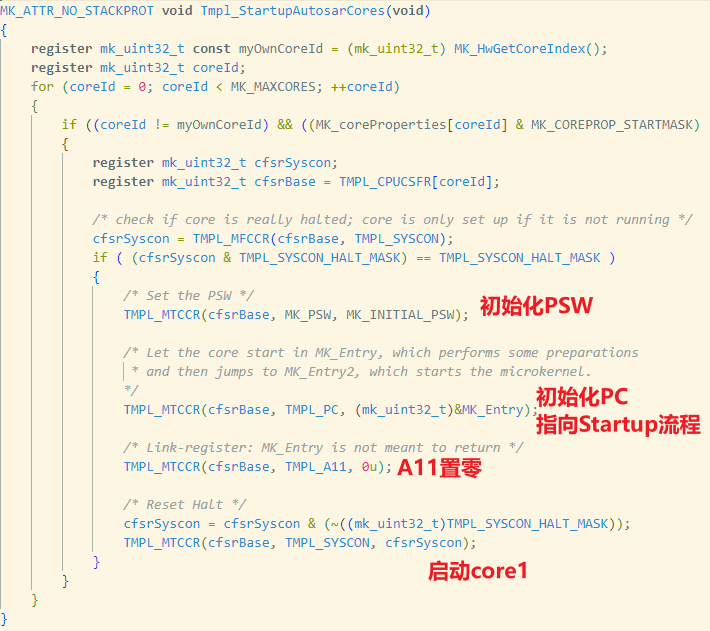
先初始化BTV,然后进入Tmpl_StartupAutosarCores 初始化Core1的PSW、A11等寄存器
并将Core1的PC也指向MK_Entry
MK_ATTR_NO_STACKPROT void Tmpl_DemoStartup(void)
{
	mk_objectid_t const coreId = MK_HwGetCoreIndex();

	/* The OS expects that its startup is not continued, if an exception occurs.
	 * For our demo we set the startup exception table.
	*/
	MK_WriteEndinit(0u);
	MK_MTCR(MK_BTV, (mk_uint32_t) &MK_StartupExceptionTable);
	MK_WriteEndinit(1u);

	/* Core 0 is the core that is started by hardware.
	 * If other cores are supposed to run, we have to start them here.
	*/
	if (coreId == 0)
	{
		/* Initialize core synchronization spots, _before_ the other cores are started.
		*/
		MK_InitSyncHere();

		/* Starts all cores which are meant to be controlled by the OS.
		*/
		Tmpl_StartupAutosarCores();         // 配置PSW, A11, PC指向MK_Entry,并启动Core1
	}

	/* If this core isn't supposed to run during the demo, it shall halt here.
	*/
	if ((MK_coreProperties[coreId] & MK_COREPROP_STARTMASK) == MK_COREPROP_NOTUSED)
	{
		/* This core is not supposed to run.
		 * Before halting we switch off the watchdog of the current core.
		*/
		MK_WriteEndinit(0);
		MK_GetScuWdtCpuCon()->wdtxcon1 |= TMPL_SCU_WDTCON1_DR;
		MK_WriteEndinit(1);

		TMPL_ENDLESSLOOP();
	}
}之后Core1也从MK_Entry启动,最后两个核心都进入MK_Entry2,设置各个核心的BIV、BTV等,做最后进入main函数前的初始化工作
双核OS启动——核间中断
MK_Entry2结束后Core0会直接跳入main函数,Core1跳入idle函数,等待Core0启动

Core0在main中调用EcuM_init从而调用StartOS API,正式启动OS,再通过核间中断,将Core1跳入main()

Core1跳入中断处理程序,准备好跳入main并返回状态

Core1通过软件中断触发核间中断,将状态反馈给Core0

之后Core1进入main函数

Core0接收到Core1状态正常后,继续执行main逻辑,然后各自核心跳入到设置好的initTask中 完成应用逻辑初始化
观察
Core0先启动 Core1 Inactive
观察CPU1_SYSCON

错误处理与Hook函数
每个核心的ErrorHook是独立的